
🥢 Introduction: The Godfather of Chinese Takeout
Long before Sweet and Sour Chicken conquered shopping mall food courts across America and Europe, there was the original, undisputed king of the sweet and tangy flavor profile: Sweet and Sour Pork (咕噜肉 - Gūlūròu).
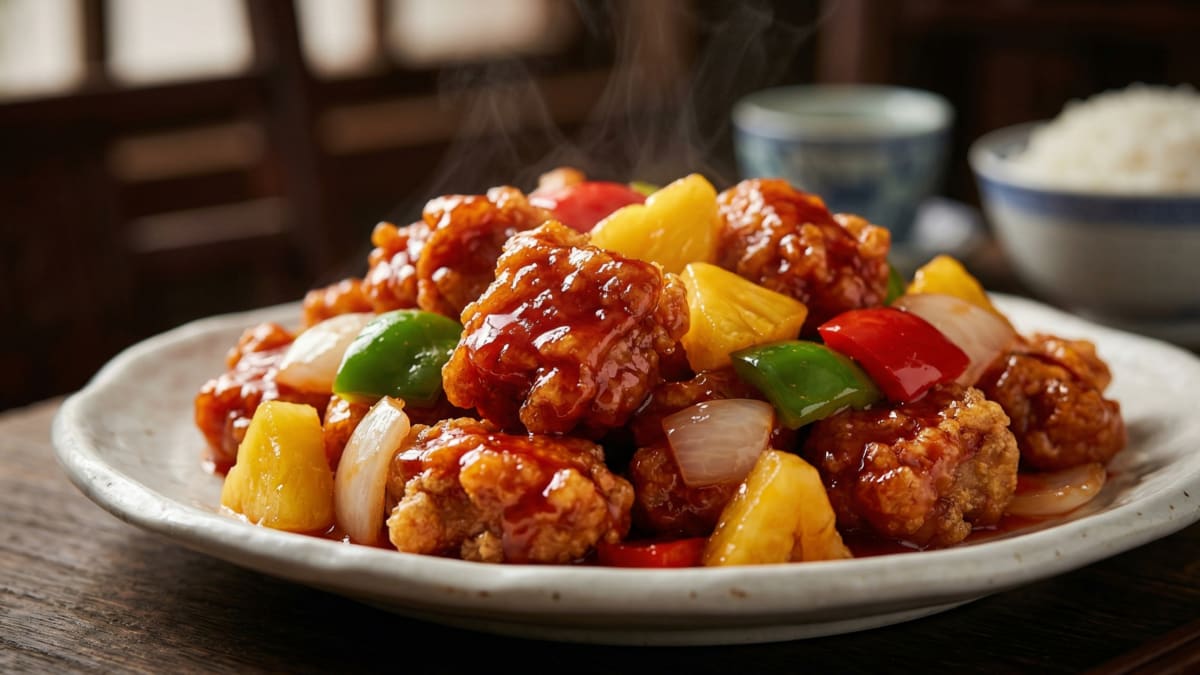
Hailing from the Guangdong province of China (formerly known in the West as Canton), this dish is a culinary masterpiece of balance. When executed perfectly in a traditional Cantonese restaurant, it features chunks of heavily marbled pork with a blistered, shatteringly crisp crust. When you bite into it, the rich, melting pork fat mixes with a brilliantly balanced Tángcùzhī (糖醋汁 - Sweet and Sour Sauce) that is vibrant, fruity, and deeply savory.
In the Western world, this dish has unfortunately been bastardized into dry, overcooked cubes of lean pork drowning in a pool of artificial, neon-red syrup. Today, we are going back to the roots. We are going to reveal the authentic Cantonese restaurant secrets to choosing the right cut of meat, formulating the perfect batter, and achieving a sauce that tastes like a Michelin-starred dim sum parlor.
📜 The Legend: What Does “Gu Lu” Mean?
Have you ever wondered where the strange Chinese name Gu Lu Rou comes from?
In Chinese culture, Gūlū (咕噜) is an onomatopoeia—a word that imitates a sound. There are two legendary explanations for this name, and both perfectly describe how incredibly appetizing this dish is:
- The Sound of the Wok: Some say it mimics the bubbling, popping sound the rich sweet and sour sauce makes when it is furiously reducing and caramelizing in a blazing hot wok.
- The Sound of Desire: The more popular theory is that the dish smells so incredibly fragrant, tart, and sweet as it comes out of the kitchen that it makes guests instantly salivate, creating a loud “gu lu” sound as they swallow their saliva in anticipation!
Whatever the true origin, one thing is certain: a properly made plate of Gu Lu Rou is completely irresistible.
🥩 The Culinary Science: Fat, Starch, and Acid
To elevate your homemade sweet and sour pork from “average” to “authentic Cantonese restaurant quality,” you must master three crucial elements of Chinese culinary physics.
1. The Golden Cut: Pork Collar (梅花肉)
The absolute fastest way to ruin this dish is to use lean pork chops or pork loin. Deep-frying lean pork twice will turn it into tough, chewy leather. Authentic Gu Lu Rou requires fat. You must buy Pork Collar, Pork Shoulder, or Pork Butt (梅花肉 - Méihuāròu). This cut is named “Plum Blossom Meat” because of its beautiful, intricate marbling of intramuscular fat. When deep-fried, this fat renders down, essentially basting the pork from the inside out. The result is a piece of meat that practically melts in your mouth, providing a rich, savory contrast to the sharp, acidic sauce.
2. The Secret Batter: Sweet Potato Starch (地瓜粉)
While cornstarch is the standard for frying chicken, legendary Cantonese chefs often use Sweet Potato Starch (地瓜粉 - Dìguāfěn) or Tapioca starch for their pork. Sweet potato starch creates a slightly thicker, incredibly craggy, and bubbly crust. These little crispy craters are essential because they act like tiny pockets, catching and holding onto the sticky sweet and sour sauce.
3. The Authentic Sauce Base
While Americanized versions rely heavily on sugar and ketchup, an authentic Cantonese Tangcuzhi derives its complex fruitiness from multiple sources. We use ketchup for color and a tomato base, but we balance it with Rice Vinegar (米醋 - Mǐcù) for a sharp tang, a splash of soy sauce for umami, and chunks of fresh Pineapple (菠萝 - Bōluó). The natural enzymes in the pineapple (bromelain) further tenderize the pork and provide a refreshing, tropical acidity that cuts right through the rich fried batter.
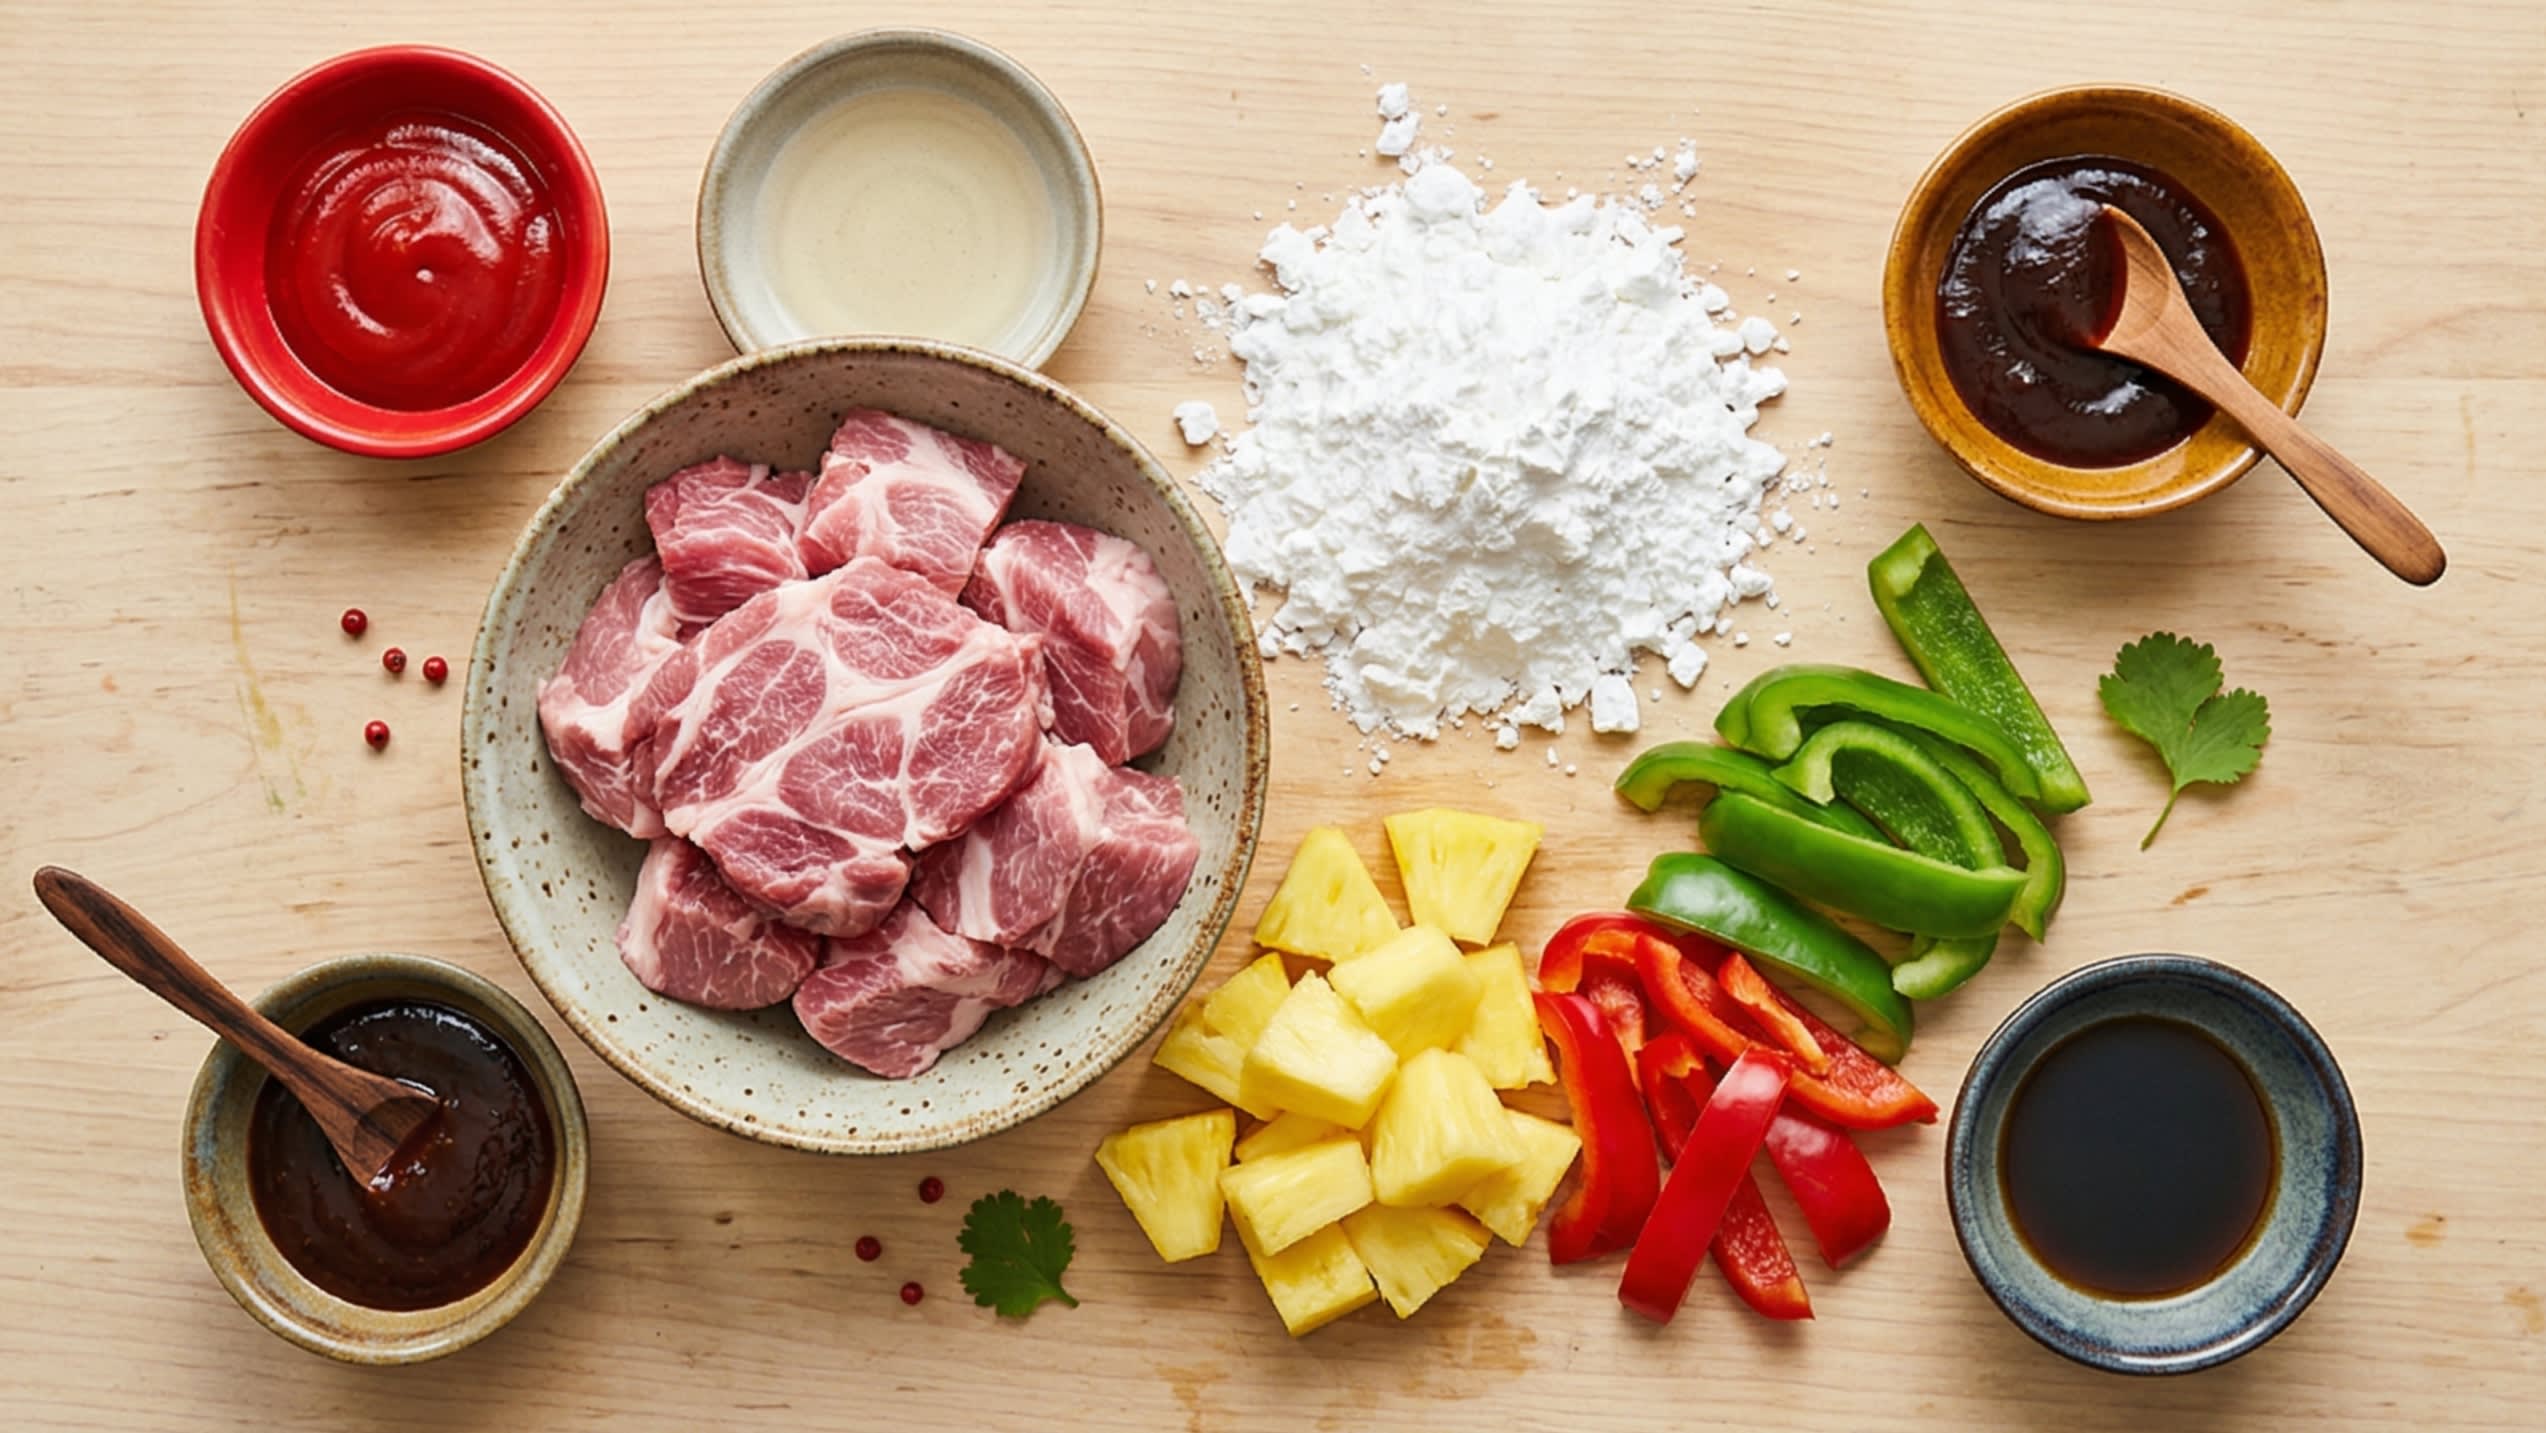
🛒 Ingredients List
The Pork & Marinade:
- 1 lb (about 450g) Pork Shoulder or Pork Butt (梅花肉), cut into 1-inch cubes
- 1 tbsp Light Soy Sauce (生抽)
- 1 tbsp Shaoxing Cooking Wine (绍兴酒)
- 1/2 tsp Salt & 1/4 tsp White Pepper powder
- 1 large Egg
The Craggy Crispy Coating:
- 1 cup Sweet Potato Starch (地瓜粉) or Tapioca Starch. If you absolutely cannot find these, Cornstarch (玉米淀粉) works as a good substitute.
The Veggies & Fruit:
- 1 cup Fresh Pineapple chunks (菠萝块) - Canned works, but fresh is infinitely better!
- 1/2 Red Bell Pepper (红椒), cut into square chunks
- 1/2 Green Bell Pepper (青椒), cut into square chunks
- 1/4 White Onion (洋葱), cut into square chunks
The Authentic Cantonese Sweet & Sour Sauce:
- 4 tbsp Tomato Ketchup (番茄酱)
- 3 tbsp Rice Vinegar (米醋) or Apple Cider Vinegar
- 3 tbsp Granulated Sugar (糖)
- 1 tbsp Plum Sauce (冰梅酱) or Hoisin Sauce - The secret to authentic Cantonese depth!
- 1 tbsp Light Soy Sauce (生抽)
- 3 tbsp Water or Pineapple Juice
- 1 tsp Cornstarch (for thickening)
The Frying:
- 4 cups high-heat Cooking Oil (peanut, canola, or vegetable oil)
🍳 Step-by-Step Instructions
1. Marinate the Pork: Place the cubed marbled pork in a large bowl. Add the light soy sauce, Shaoxing wine, salt, white pepper, and the cracked egg. Massage the mixture thoroughly with your hands until the pork absorbs all the liquid. Let it sit on the counter for 15 to 20 minutes.
2. The Craggy Batter (挂糊 - Guàhú): Place the sweet potato starch in a wide bowl. Drop the marinated pork chunks into the starch. Use your hands to squeeze and press the starch firmly into the meat. Sweet potato starch is coarser than cornstarch, so it might feel a bit pebble-like. This is exactly what you want! Make sure every wet spot is covered, then shake off the excess.
3. Whisk the Magic Sauce: In a small bowl, combine the ketchup, rice vinegar, sugar, plum sauce, light soy sauce, water (or pineapple juice), and 1 teaspoon of cornstarch. Whisk vigorously until the sugar is completely dissolved.
4. The First Fry (Cooking the Meat): Heat your oil in a wok or deep Dutch oven to 340°F (170°C). Carefully drop the coated pork pieces into the hot oil one by one to prevent them from sticking together. Fry in two batches. Cook for about 5 minutes until the pork is fully cooked inside and has a pale, firm crust. Remove with a spider strainer and let them rest on a wire rack.
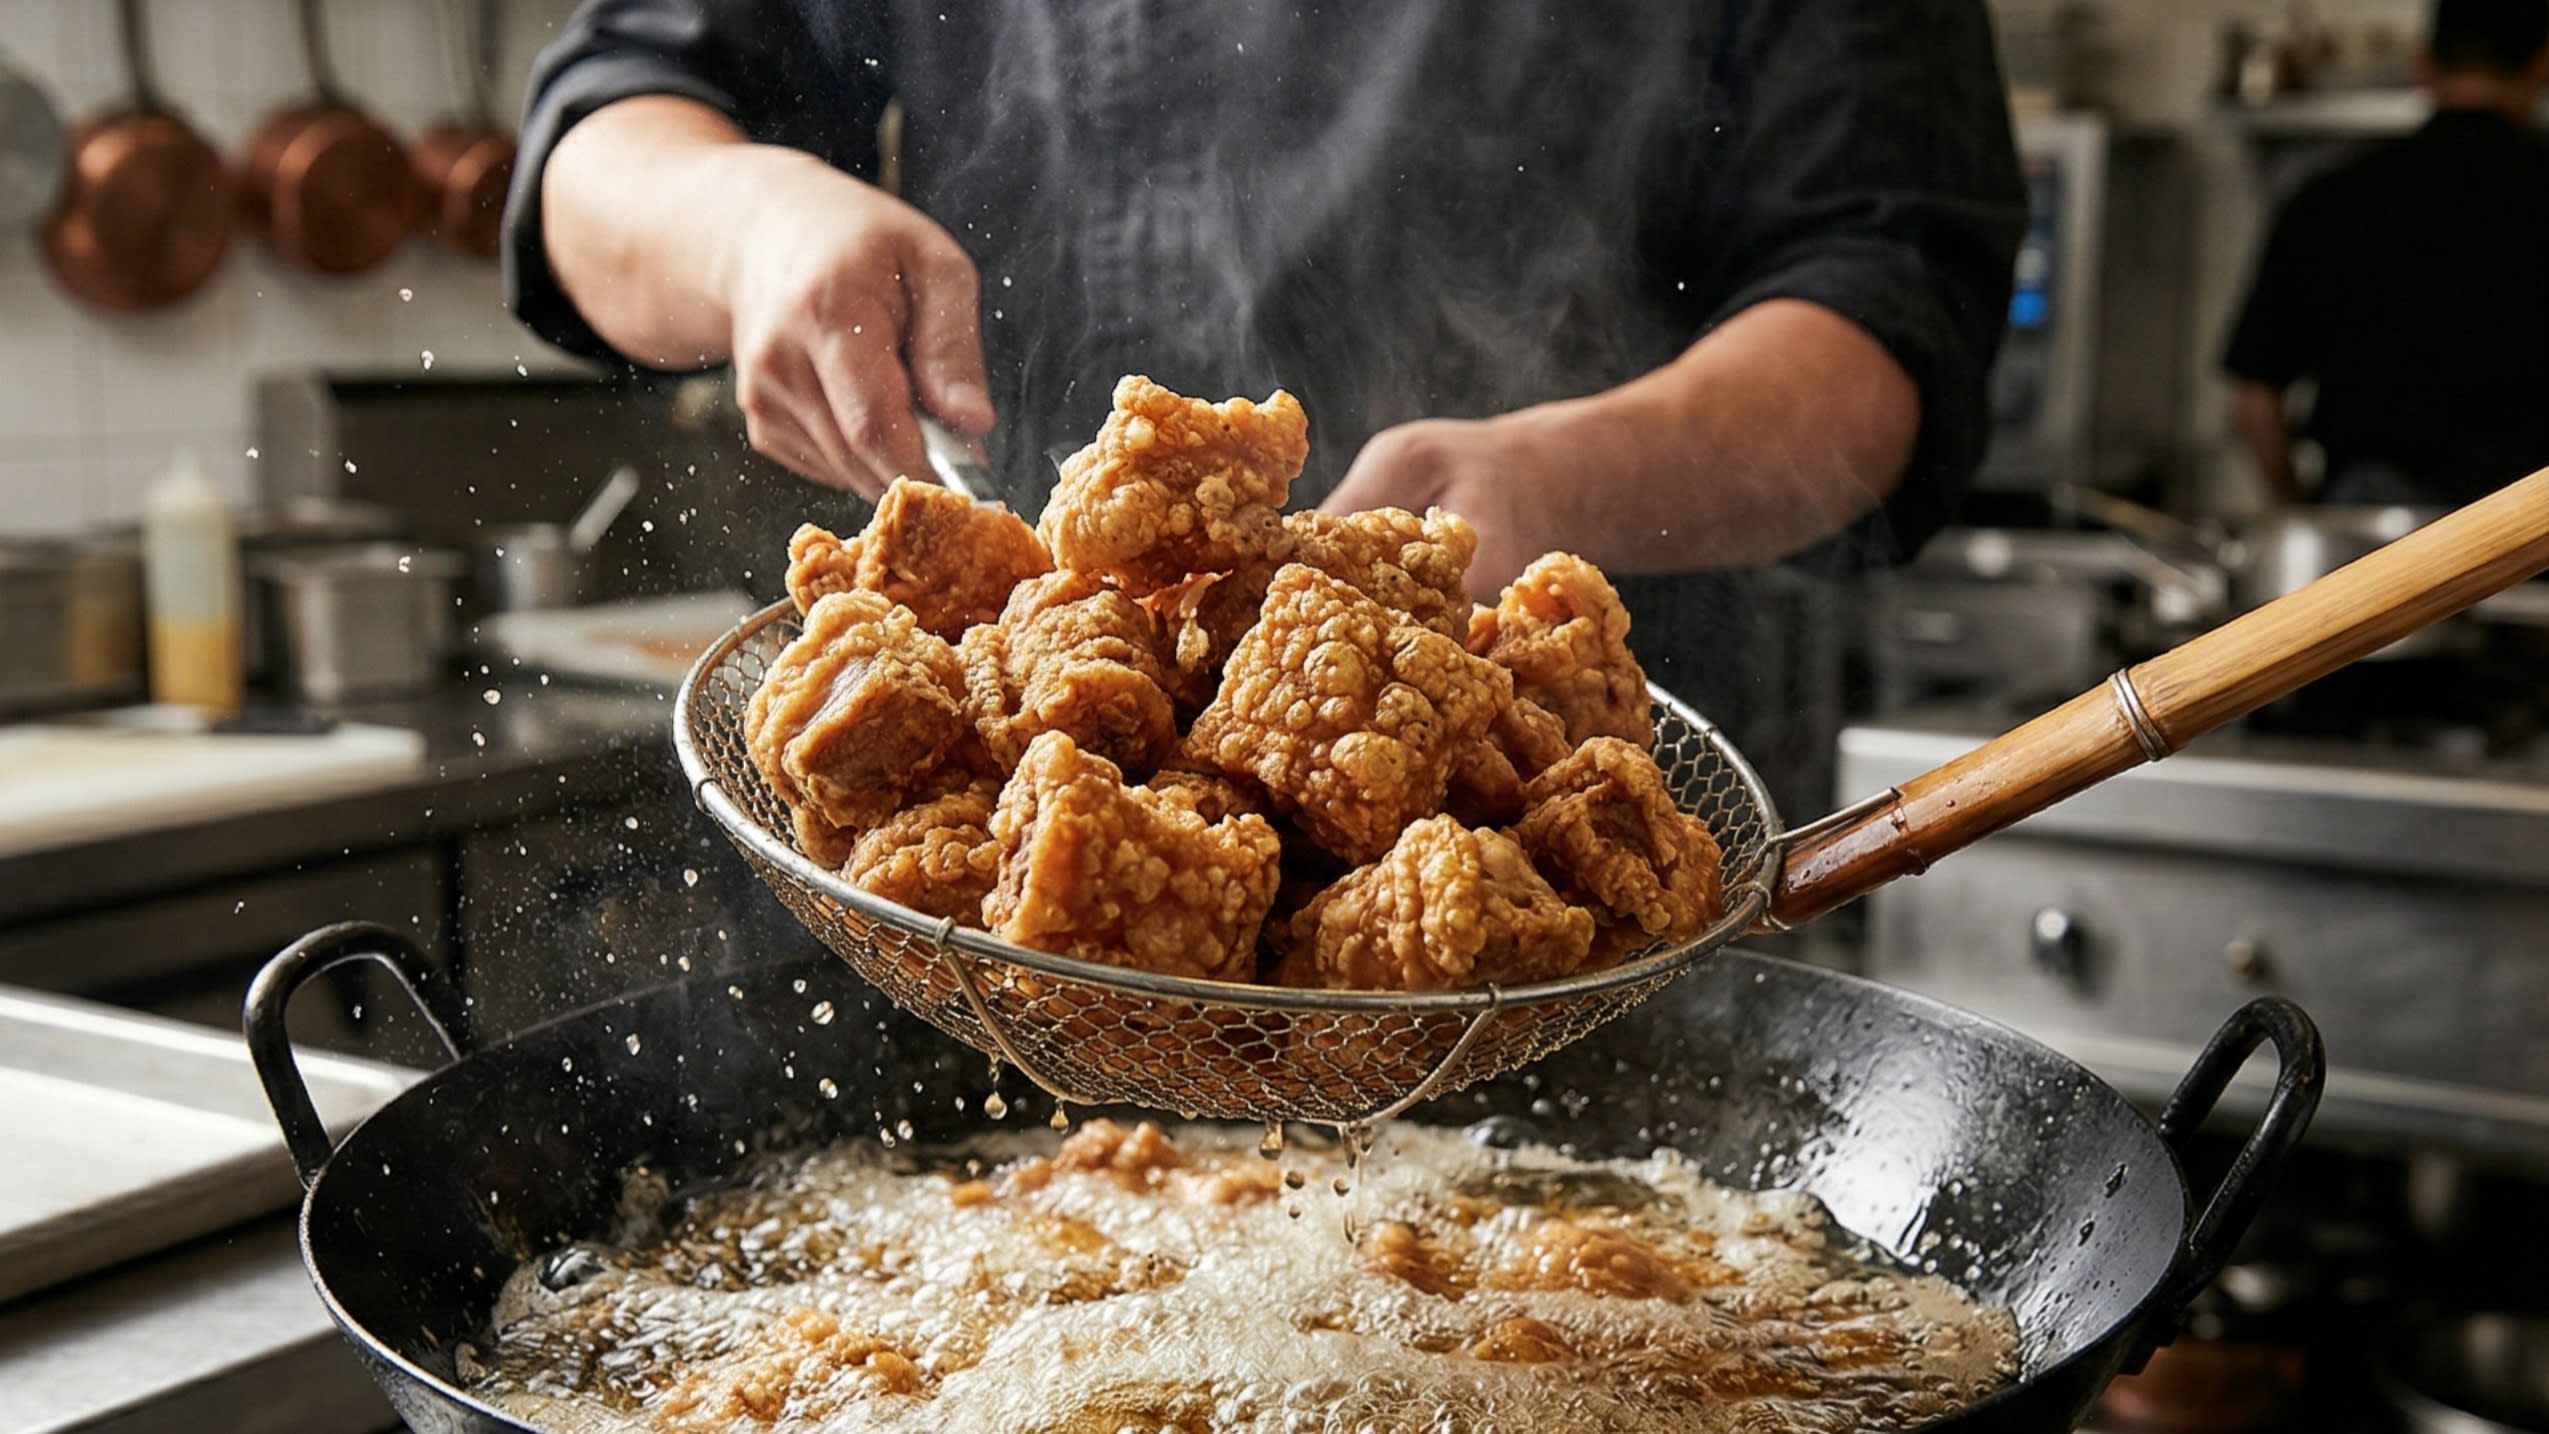
5. The Second Fry (复炸 - Fuzha): This is the secret to making the pork stay crispy under the sauce. Turn the heat up to high and let the oil hit 390°F (200°C). Drop all the rested pork back into the screaming hot oil for exactly 60 to 90 seconds. Watch as they turn a gorgeous, deep golden brown and the crust hardens into a crispy shell. Remove and drain well.
6. Blister the Veggies: Carefully pour out all the hot frying oil, leaving just 1 tablespoon in the wok. Keep the heat on medium-high. Add the diced onions, red and green bell peppers, and pineapple chunks. Stir-fry for just 45 seconds. You want them slightly blistered and fragrant, but they must remain crisp and vibrant.
7. Thicken the Glaze (勾芡 - Gōuqiàn): Give your prepared sweet and sour sauce a quick stir, and pour it directly into the wok with the vegetables. Stir constantly. Within 30 seconds, the sauce will bubble, reduce, and transform into a thick, glossy, vibrant ruby-red syrup that coats the back of a spoon.
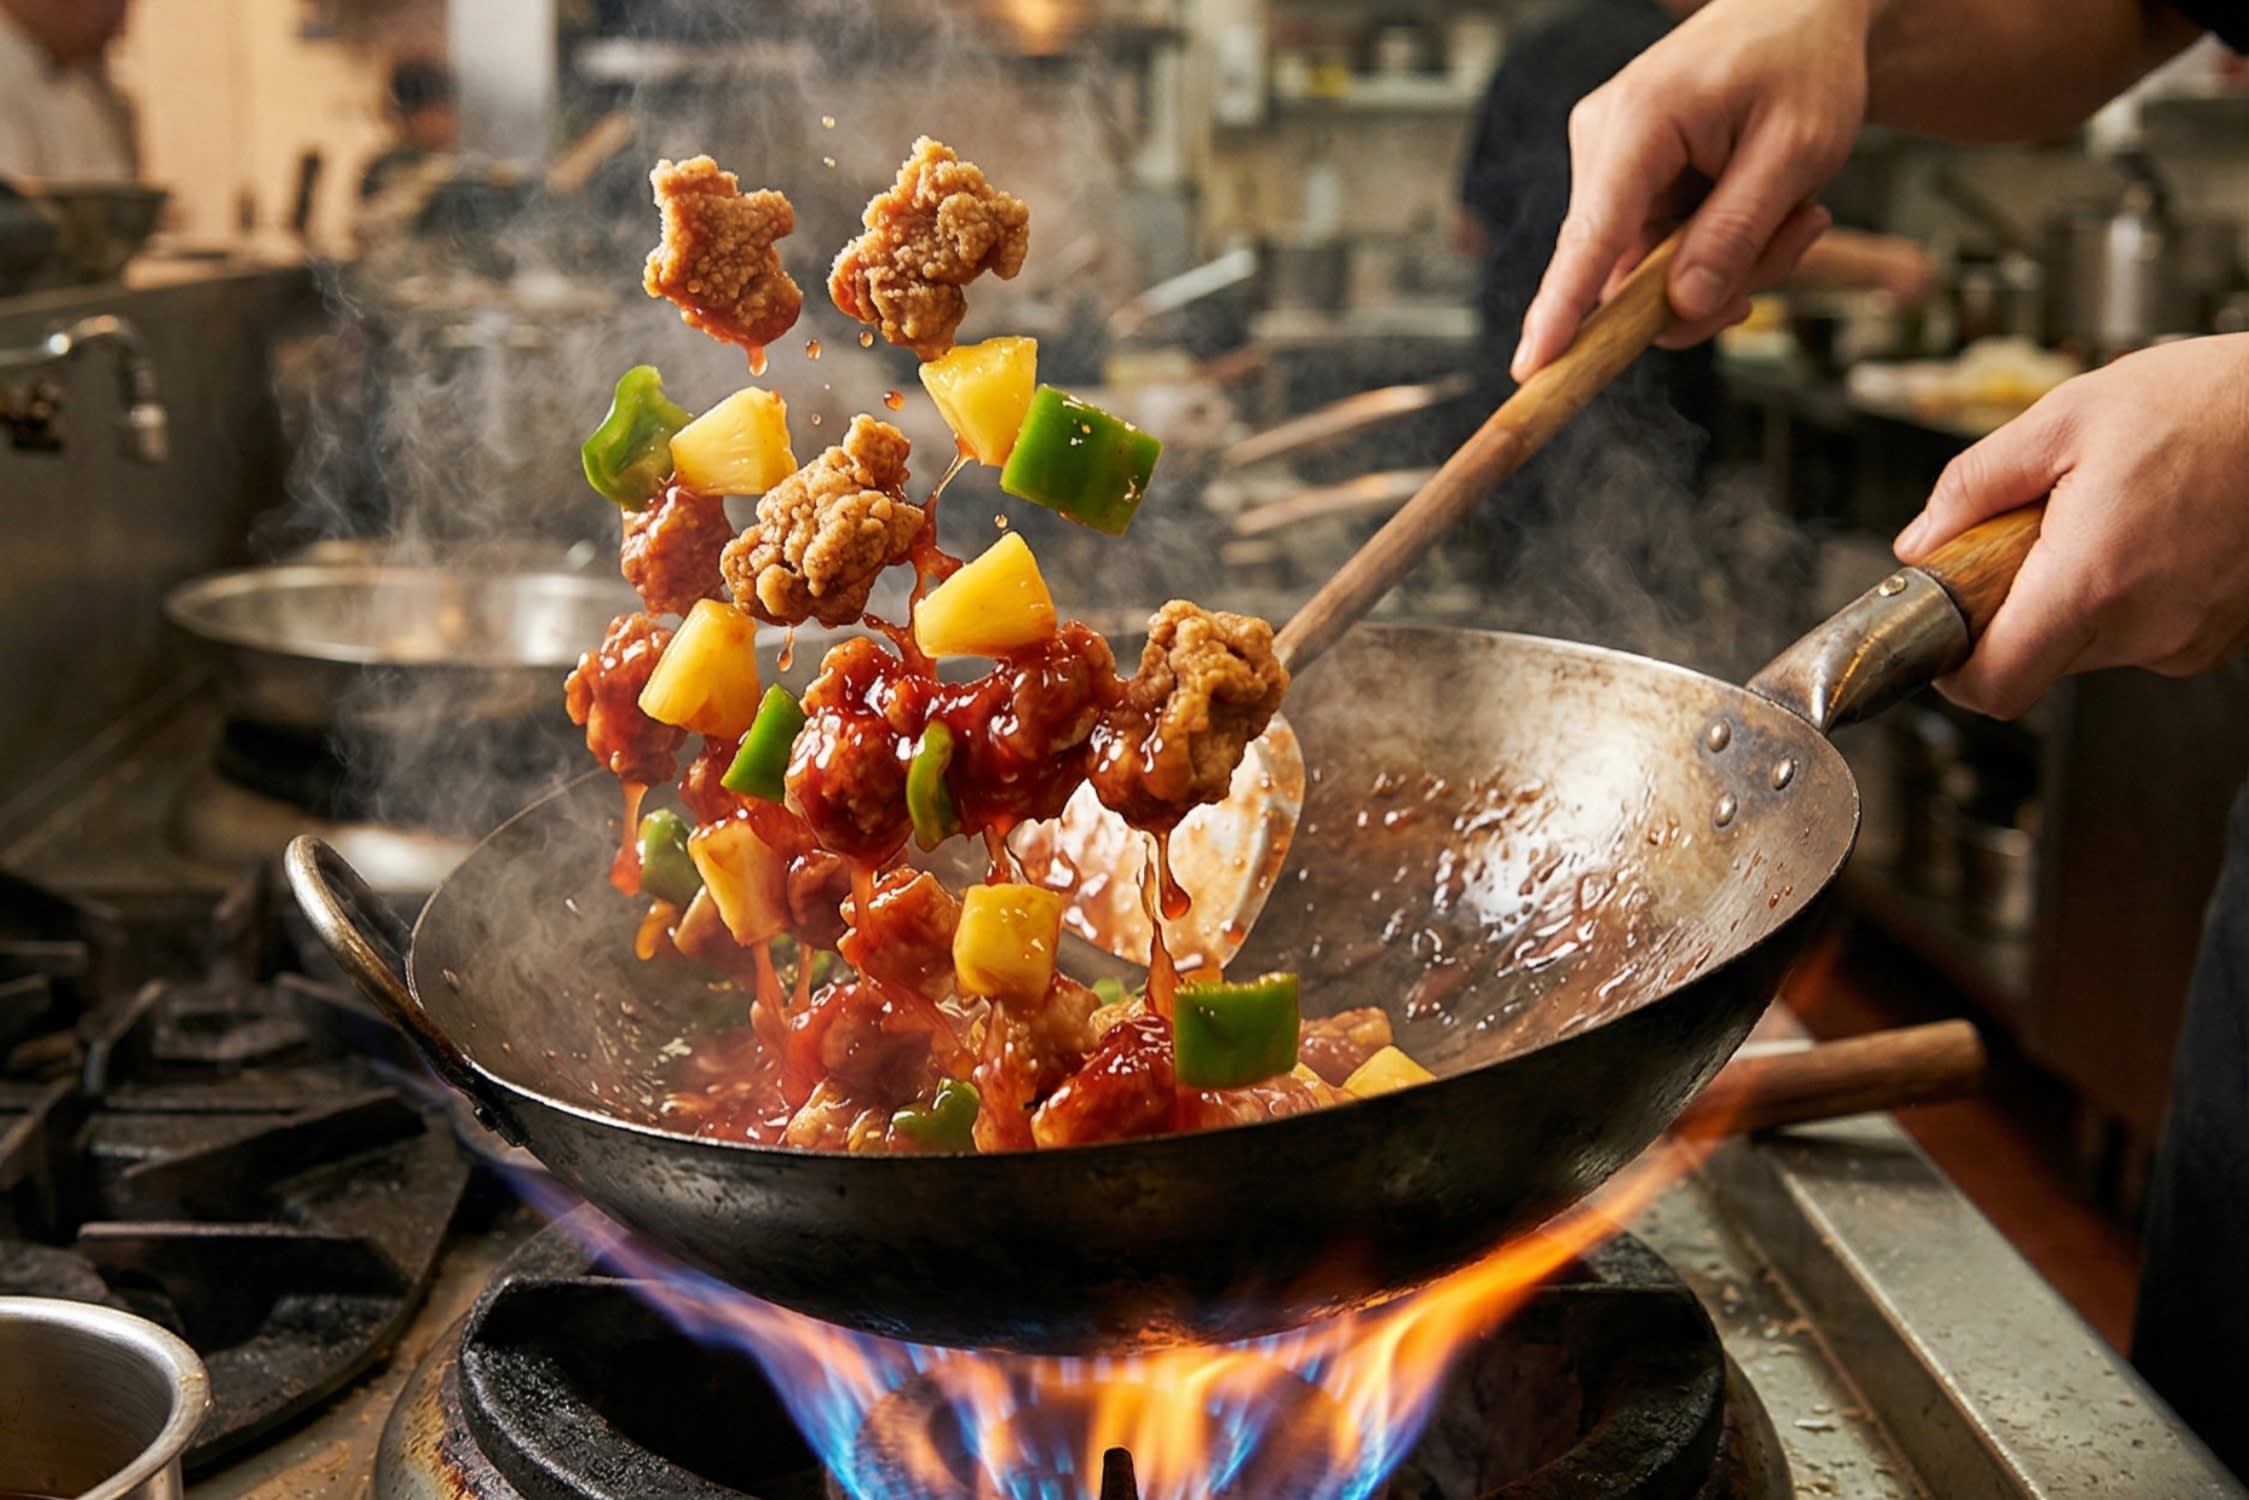
8. The Final Toss: The absolute moment the sauce is thick and shiny, dump your crispy double-fried pork into the wok. Turn off the heat immediately. Use your spatula to fold and toss everything aggressively for 10 seconds until every single piece of pork is beautifully coated in the sticky red glaze.
9. Serve: Plate the dish immediately. Serve piping hot with a generous bowl of steamed Jasmine rice. Prepare yourself for the most authentic, shatteringly crisp bite of Cantonese BBQ you have ever experienced!
💡 Troubleshooting & Pro Tips
- Why is my pork tough and chewy? You used pork loin or pork chops. Lean meat cannot survive the high heat of deep frying. You must use marbled pork shoulder/butt (梅花肉) for this recipe!
- Why did the breading fall off in the pan? You didn’t press the starch hard enough into the wet pork, or your frying oil was not hot enough when the meat hit the pan. If the oil is too cold, the breading will wash off in the oil.
- Is Plum Sauce really necessary? While you can make a decent sauce with just ketchup and vinegar, authentic Cantonese Gu Lu Rou relies on the complex, fruity depth of Chinese plum sauce (冰梅酱). It elevates the dish from “fast food” to “gourmet restaurant.”
📦 Shop Authentic Kitchen Essentials
To achieve that legendary restaurant-quality craggy crunch and perfectly balanced Cantonese sauce, these specific ingredients are absolute game-changers. (As an Amazon Associate, ChinaCurator earns from qualifying purchases.)
- Coarse Sweet Potato Starch (地瓜粉) - The absolute secret to an ultra-crispy, bubbly, craggy crust that holds onto the sauce perfectly.
- Lee Kum Kee Plum Sauce (冰梅酱) - The traditional Cantonese secret ingredient for a complex, fruity sweet and sour base.
- Asian Stainless Steel Spider Strainer - The mandatory tool for safely scooping crispy pork out of boiling hot oil without losing the breading.